I finished putting the stain and poly on the bunk board, fabbed the bunk ladder (also treated with poly - no stain since it's oak), installed tie downs for the under-bunk storage bin and AC, and strapped them in. Installed the TV and mount, and fabbed a little shelf for the media player - it's made out of a sheet of aluminum, some angle brackets and a few zip ties. It's suspended below the TV and uses the same mount. I ended up modifying the ladder a bit because it wasn't holding well to the railing. The second picture above shows the angle brackets holding it in place.
Also shown installed is the bike fork mount, attached to the floor on the far side of the trailer. Not only is on the far wall out of traffic, it should keep us from stubbing our toes on the carriage bolt located behind it. Fortunately, all the other carriage bolts are fairly well out of the way.
I had looked at different ways of bringing bikes along - various hitches and such - but the simplest, most secure way of transporting my bike was inside the camper, plain and simple. I just need to bungee the front wheel and Nate's bike to my own and I'm ready to travel.
I installed two Levolor roller shades above the windows. My apologies for the blurry picture. The shade are behind two valence boxes that I made. These will be padded and covered with the same material the curtains are made of. The boxes are made of 1/4" Oak Luan, a couple 1/2" by 1/2" wooden stiffeners. They're very lightweight and somewhat delicate - I hope they will hold up.
Mounting them was a challenge. I had to come up with a way to align and level the boxes without having direct access to the angle brackets. After mounting them to the stiffeners on the inside of the boxes, I drilled holes in the front box face. You can see them along the vertical outer edge of the box face in the picture above. These holes are directly across from those in the angle bracket sections that mount to the wall. I positioned the box on the wall, then passed a pencil through each hole; passing it through the bracket and marking the drill point on the wall. I then removed the brackets from the valences and mounted them on the wall. The holes will be covered up when the valence is upholstered, but then all I'll need to do is position the boxes on top of the brackets already on the walls, and reattach the boxes to the brackets from below.
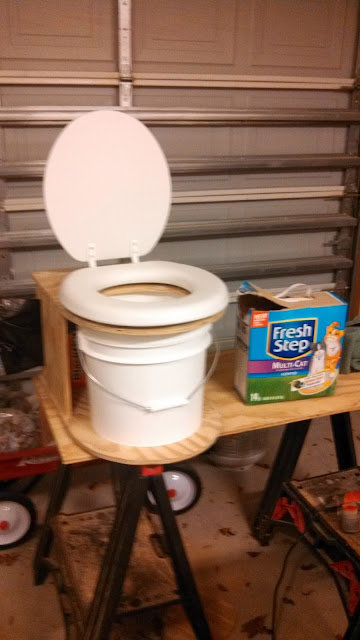
And at last, here's a first look at 'Mr. Stinky' - the camp toilet. Not all that much to it - it's a frame constructed from 1/2" treated plywood, a 3 1/2 gallon bucket, and a cheap toilet seat. You can also just make out the black trash bag 'dispenser' on the left side. The basics of operation are that the trash bag goes into the bucket and around the top of the frame, and the seat goes down. As to the other 'basics of operation,' there's no need to elaborate - except that the other 'ingredient' is in the box to the right. In reality, this may not live up to its name. I chose to build a camp toilet over a porta-potty not only due to cost (you're looking at less than $20 in materials compared to a $100 portapotty), it is far more sanitary: No tank dump or maintain - just a bag to toss.
There's just a little more work to be done. I need to add a couple cross-braces in the back, then treat the wood with poly. I'm putting some felt discs on the bottom to protect the floor from scratches, and I'd like to mount a small plastic container behind the seat to store the kitty litter, but we'll see if I get to that point. It will be stowed under the bunk next to the door and the fire extinguisher.
Obviously there's been a few smirks about Mr. Stinky, but I'm sure we will like having him close by when the need arises in the middle of the night and it's a long walk to the bathouse!
It's been just over two months since I had her out of the garage. In getting ready for the upcoming trip I gave her a good washdown and she sure does shine in the sun! Thinking back on all the work to get her ready, I am really happy how things came together, and I'm looking forward to getting her in her element and see how she does!


No comments:
Post a Comment