Wednesday, January 15, 2014

New Design ... and a New Name

It's been since November since I've last posted on the blog, but with the holidays being what they are, a bit of a slowdown in activity was to be expected. After Christmas I decided to re-engage Chris at Wrap Works on the teardrop decal design.

We played around with the Compass Rose logo in a proof or two, but as it turned out the graphic wasn't going to suit the 'canvas' it was going on. So I went down to Chris's shop on a Saturday evening and we played around with Illustrator for an hour and came up with a better design - one that would compliment the profile of the trailer and provide some visual balance.

This past next weekend I brought the trailer in and by Sunday he had it all done ...


Given the new design I've decided to change the name to SunBreak - which is when the clouds open up and the sun's rays shine down. Yeah, a bit 'campy' (no pun intended) - just need some Care Bears dancing around a firepit holding hands, right? At any rate, 'Compass Rose' just no longer fits as well as I hoped, so I had to come up with something else. I think he did a bang up job and I'm sure it will turn a head or two in the campground.

Now, on to the next to-do. There is ample storage space under the main bed, but with the smooth hardwood floors I have found that anything stowed under there manages to slide out from under while traveling. I'm going to make a couple cargo nets (one for the front and one for the back) that will keep all my stuff secured under the bed. They will be installed vertically between the floor and the bottom edges of the bed. I looked around for a 6 foot by 1 foot net, but none were to be found (no surprise given the odd dimensions). So I am going to fabricate some myself, using some paracord and mini caribiners. 

Our next camping trip is going to be to Disney's Fort Wilderness at the end of Februrary. I've been told this place has been known to spoil campers, but I'm willing to take the risk! I'm sure we'll have a good time down there.


Saturday, December 7, 2013

First Trip was a Success

The Compass Rose's maiden outing was to Falls Lake, NC for Thanksgiving. The views were beautiful, and it was great having the family all together - my parents, my sister's family, and mine - in separate campers, of course :)

Here is the view of our site on Thanksgiving morning ...


As you can see I've found a good spot for my large Coleman cooler. I just lashed it to the tongue with a ratchet strap and plan on carrying it that way for future trips.


Here the two kiddies are enjoying the front bunk. You can see the Sunbeam ceramic heater in the foreground. It was very, very cold (around 24 degrees at night), and while we could definitely feel the chill from the floor, this little heater was more than enough to keep us warm. I pulled the table out and set it there, essentially putting it in the middle of the trailer. 

There is definitely a pronounced thermocline within the trailer. The bunk - being up the highest and closest to the insulated roof - was much warmer than the futon. I think I will bring my small fan next time to help circulate the air better.

We also found 'Mr. Stinky' incredibly valuable to have onboard, especially in the morning :) Odd to say, but I was very pleased - nothing 'malodorous' about it.

I also made good use of the external power plugs next to the door. I set up my little camp table and plugged in my single cup coffee maker for a proper breakfast each morning.

It also turned out to be a good location for prepping other meals ... 


... and cooking them on my Camp Chef Explorer Stove, also in close reach of the cooler on the tongue.


Lessons learned from the trip ...
  • Need to come up with better exterior lighting at night. I'm thinking of putting together some more LED fixtures, but have to figure out where these would go and what would they look like.
  • Didn't really need to put the futon in 'couch mode', and I want to use the quilted mattress topper next time - the futon is much more firm than my regular bed.
  • Cabinetry for the unused space in the rear will be a welcome addition. In the new year I'll look to fabricate and install something, but at present I'm still getting my ideas together. I did find the space between the futon and the back wall handy for just dumping stuff, but storage for little things that need to stay in the trailer is needed.
The next thing done will be the Compass Rose decals. I was able to re-engage the decal designer and show him the trailer. He has provided some proofs, and I'm thinking that perhaps in the next week or two we will have the Compass Rose sporting her custom livery.


Monday, November 25, 2013

Curtains and Valences

Just a few finishing touches on the teardrop tonight. My colleague finished the curtains ...


I also had enough fabric left to upholster the valences. Each included two sheets of 1" batting glued to the valence face. I stapled and glued the fabric to the back, then attached them to the angle brackets on the wall. I'm really happy with how the valences turned out.

Sunday, November 24, 2013

Just About Ready for the First Outing

It's been two weeks since the last post and I've made some great progress on the Compass Rose:


I finished putting the stain and poly on the bunk board, fabbed the bunk ladder (also treated with poly - no stain since it's oak), installed tie downs for the under-bunk storage bin and AC, and strapped them in. Installed the TV and mount, and fabbed a little shelf for the media player - it's made out of a sheet of aluminum, some angle brackets and a few zip ties. It's suspended below the TV and uses the same mount. I ended up modifying the ladder a bit because it wasn't holding well to the railing. The second picture above shows the angle brackets holding it in place.


Also shown installed is the bike fork mount, attached to the floor on the far side of the trailer. Not only is on the far wall out of traffic, it should keep us from stubbing our toes on the carriage bolt located behind it. Fortunately, all the other carriage bolts are fairly well out of the way. 
I had looked at different ways of bringing bikes along - various hitches and such - but the simplest, most secure way of transporting my bike was inside the camper, plain and simple. I just need to bungee the front wheel and Nate's bike to my own and I'm ready to travel.


I also installed the curtain tracks under the bunk. The curtains should arrive Monday.They are of different heights and are staggered a bit, due to needing clearance for the pull out table.


I installed two Levolor roller shades above the windows. My apologies for the blurry picture. The shade are behind two valence boxes that I made. These will be padded and covered with the same material the curtains are made of. The boxes are made of 1/4" Oak Luan, a couple 1/2" by 1/2" wooden stiffeners. They're very lightweight and somewhat delicate - I hope they will hold up.

Mounting them was a challenge. I had to come up with a way to align and level the boxes without having direct access to the angle brackets. After mounting them to the stiffeners on the inside of the boxes, I drilled holes in the front box face. You can see them along the vertical outer edge of the box face in the picture above. These holes are directly across from those in the angle bracket sections that mount to the wall. I positioned the box on the wall, then passed a pencil through each hole; passing it through the bracket and marking the drill point on the wall. I then removed the brackets from the valences and mounted them on the wall. The holes will be covered up when the valence is upholstered, but then all I'll need to do is position the boxes on top of the brackets already on the walls, and reattach the boxes to the brackets from below.


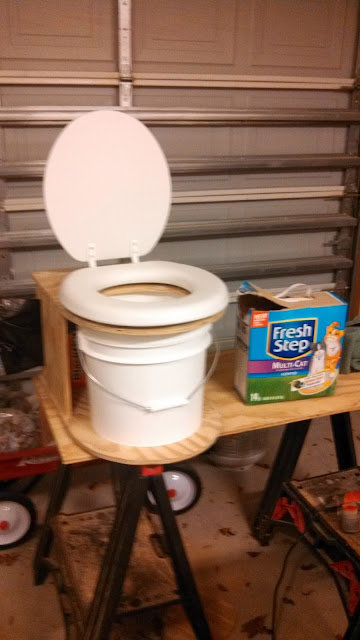
And at last, here's a first look at 'Mr. Stinky' - the camp toilet. Not all that much to it - it's a frame constructed from 1/2" treated plywood, a 3 1/2 gallon bucket, and a cheap toilet seat. You can also just make out the black trash bag 'dispenser' on the left side. The basics of operation are that the trash bag goes into the bucket and around the top of the frame, and the seat goes down. As to the other 'basics of operation,' there's no need to elaborate - except that the other 'ingredient' is in the box to the right. In reality, this may not live up to its name. I chose to build a camp toilet over a porta-potty not only due to cost (you're looking at less than $20 in materials compared to a $100 portapotty), it is far more sanitary: No tank dump or maintain - just a bag to toss.

There's just a little more work to be done. I need to add a couple cross-braces in the back, then treat the wood with poly. I'm putting some felt discs on the bottom to protect the floor from scratches, and I'd like to mount a small plastic container behind the seat to store the kitty litter, but we'll see if I get to that point. It will be stowed under the bunk next to the door and the fire extinguisher.

Obviously there's been a few smirks about Mr. Stinky, but I'm sure we will like having him close by when the need arises in the middle of the night and it's a long walk to the bathouse!


It's been just over two months since I had her out of the garage. In getting ready for the upcoming trip I gave her a good washdown and she sure does shine in the sun! Thinking back on all the work to get her ready, I am really happy how things came together, and I'm looking forward to getting her in her element and see how she does!

Sunday, November 10, 2013

Work Done on the Bunk

So as of Friday I had all kinds of ideas floating around in my head on how I was going to build out the forward bunk. After Googling 'bunk design' and looking through dozens of pictures of all kinds of bunk beds, I came across one used in a yacht. As I was waiting for a meeting to get started, a flipped over a sheet of paper and sketched out my idea ...


The design called for a single solid board that rose up just above the height of the mattress. At one end of the bunk the edge drops down low, allowing for the occupant to climb in and out. Here I've set the access on the left side. I've sketched a short, two step ladder leading up to the bunk. It's located in front of the A/C. This seemed like the best place to put the ladder. In the center at the bottom, the board has a lower section - the two small boxes next to the ladder are the power receptacles, and the long slot is for a small pull-out table. The idea for the table is that it will stick out just a bit when 'retracted' - creating a small shelf to put drinks or a cell phone, but can be pulled out to serve as a small dining table. This left the entire space below the bunk open for storage.

Saturday it was back to Lowes for materials. I finished the 'lifting strap' and attached it to the futon seat back. It works well, although there is a bit of technique to raising the seat back that requires some muscle. I also installed a couple D-Rings in the floor as anchor points for the A/C. I had purchased a bungee that was rated for the length needed to wrap around the A/C, but despite using every bit of my strength to stretch it around the top of the unit, it was about an inch short. I settled on using an old cam buckle tie down, and as a measure intended to cushion the air conditioner, I fashioned some foam suspension out of two lengths of hardwood dowel shrouded in 1" foam pipe insulation, and positioned these under the A/C. With the tie down snug, there is a little give and spring to help with bumps while traveling. I figure that while it was a portable A/C unit, it probably wasn't designed with this purpose in mind.

While at Lowes I picked up the wood and hardware needed to build out the bunk. I first installed some blocking underneath for the table slide rails. I also cut the table from a 2 x 2 section of 5/8" birch plywood - not unlike what is used in the walls. I put a few coats of poly on it in between other tasks. I finished up Saturday with the rails installed, and the power receptacle moved a few inches to the left.

Sunday morning I started back on the table - I wanted to get the extension part right and confirm the dimensions for the slot in the bunk board. I attached the table rails and slid it in - works beautifully and the shelf extension is perfect. Fully extended, one can sit on the futon and use the table without having to lean forward. 

After cutting the bunk board to the correct width, I installed some blocking on the inside edges at the ends. The blocking allowed the board to sit at the correct height when dry fitted to the bunk frame. This made it easier to clamp it in and set my register marks for the slot, receptacles, and lower edges. Then came the jigsaw work, which was tricky given that mine isn't very precise. But I hedged my cuts a bit and was able to clean up the edges with the power sander. I dry fitted the board again and confirmed my cutouts were aligned properly. The last cut was for the bunk access 'drop down'. The blocking on this end was just screwed in (no glue) to provide temporary support. I removed it, made my cut and then sanded down the edges on both sides. One last dry fit check, then I applied the glue, leveled and clamped in the board, then drilled and screwed it to the frame.

Have a look at the results ...


I installed buttons in the screw holes to clean it up a bit. I'll use a light stain on the bunk board to match the color of the walls, followed by several coats of poly.


You can see the cut out for the receptacles and the slot for the table. I'm going to try to trim a plastic cover down so that it fits cleanly in the cutout. Also the table is shown in the 'shelf' position.


Table fully extended. The rails are rated at 75 pounds - plenty of strength for a couple place settings, a coffee pot or laptop.


Judging by that face I believe we have the coveted 'kid's seal of approval'. Snug as a bug in a rug!

Over next week - staining and finishing the bunk board. Next weekend - building the ladder, installing the TV, possibly fabbing the 'bike cleat', and maybe getting around to building 'Mr. Stinky', the camp toilet. I'll save that task for last!


Sunday, November 3, 2013

Functioning Futon!


Whew! Turned another big corner with installing the futon this weekend, Here are a few pictures. There are some odds and ends left to do on it, but as you can see it's ready to use.


The linkage works well, however the hope that sliding the seat section would be enough to lift the seat back didn't pan out. The seat is just too heavy to go up unassisted. I had thought of deploying a couple heavy duty springs, but for simplicity's sake I'm going to try connecting a lifting strap to the top edge of the seatback. Think ski tow rope, but much shorter and with two attachment points. This should allow me to pull seat back up while facing the futon.


Here is the futon with a new cover, a couple throw pillows, and a happy little camper! It is very comfortable, and the seat height is just perfect. And look at all that room underneath for storage. I'm betting I'll be able to stow an 'easy-up' canopy under there without issue. I also need to cut and install a couple 'tracks' in the gaps between the walls and the futon frame - to keep it sliding straight. There's about 3/4"of space on either side.

While you can't really see it with the futon in the up position, there is a good-sized gap between the back edge of the futon and the back of the camper. At some point I will add a small cabinet back there - a shelf with sliding doors and a ledge above it. I'm also thinking of wiring up a couple built=in speakers for a radio or maybe a tie-in to the TV. But for now I need to finish up a few more critical tasks, like Nate's bunk and installing the TV. I also need to put together the 'camp toilet' - that ought to be interesting!

Thursday, October 31, 2013

Futon Frame Finalized

For the past few weeks I've been narrowing in on my design for the futon frame using Google Sketchup. I know I'm starting to sound like a fanboy for this program, but it's hard not to be impressed with how simple it makes 3D modeling. That's good because I'm no engineer :)

I've wanted to go the direction of sliding the seat section to cause the seat back section to rise, but I needed to figure out the right linkage, and it came down to creating 5 'scenes' in the model, where the seat back would pivot 14 degrees between each scene (for a total of 70 degrees, the ideal angle for a seat back measured from the rear). If the seat section were not to slide backward, then the pivot point on the seat back would have to be a groove with a slight arc to it. But, in having the seat slide, the model shows that the seat back pivot point can indeed be a fixed point. So a carriage bolt could serve to connect the seat back section to the riser arms. Drilling holes is much easier than machining grooves!

Here are the 'up' and 'down' pictures showing the top/front of the frame:


Notice I've updated the model to show the 1 X 6's previously added. As the seat back section is lowered, the seat section slides to the edge of the support rails.

Below are shots from the underside, showing off the linkage:


I've added the 1 X 4 runner stiffeners to both sections, the seat back cross-braces that the riser arms connect to, bolt positions, and the rear connection points for the riser arms. My thought is a 1 inch steel pipe, maybe EMT, that passes through the riser arms on both sides. Construction adhesives and a couple screws should hold each in place. The outboard sections of the pipe would be held to the underside of the support rails with some pipe brackets, and allowed to pivot freely inside the brackets. I'm thinking of first mounting the pipe brackets to a pair of L-brackets, making it easier to attach them to the rails - from the sides instead of from underneath. 

As you can see, having the pivot point underneath provides some tilt to the riser arms. What I don't know is how much force will be needed to push the seat section to get the seat back to rise, but it will definitely need the pivot point to be below the plane of movement to 'kick up' the seat back.

If all goes well this weekend, the next post should have more than just illustrations to show!